Sedona
JandJdoSedona
Chicago winters can get kind of brutal at times. January and February always seem to drag on for us. For the past few years we try to go somewhere warm and sunny. Sedona has been on our radar for a few years now, and this year we finally decided to make it happen. We took a four day trip to Sedona in March.
Day 1 – Travel Day and Airport Mesa
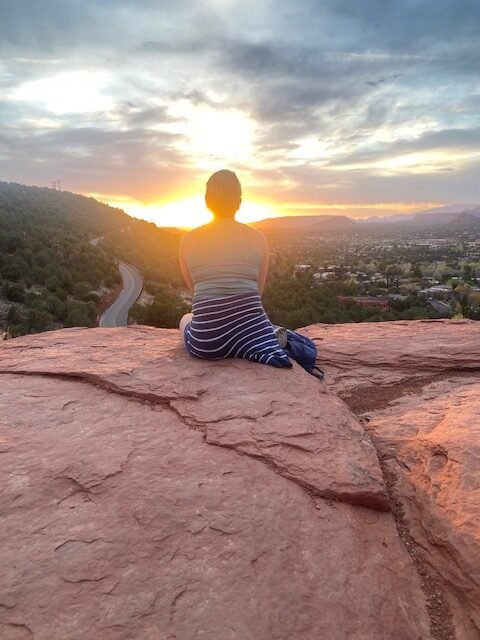
We flew into Phoenix, rented a car and drove to Sedona which is about a 2 hour drive. We arrived in Sedona around 4:30pm and checked into our Airbnb. After unpacking, we headed to a grocery store that was .5 miles away to pick up sandwhich supplies and snacks. We didn’t want to waste the entire day traveling, so we planned to see the sunset at Airport Mesa before we found somewhere to eat. Airport Mesa is a small regional airport in Sedona, which also happens to have a hiking trail around the entire airport. We read that this spot was the best place to catch a beautiful sunset. The viewing area also happens to be one of Sedona’s four main energy vortexes.
If you are driving (which you likely will be), there is a small free parking lot right below the vortex. However, this lot fills up quickly. There is a larger parking lot further up the road, which cost us $2 to park out. Grab a water for $1 at the front entrance.
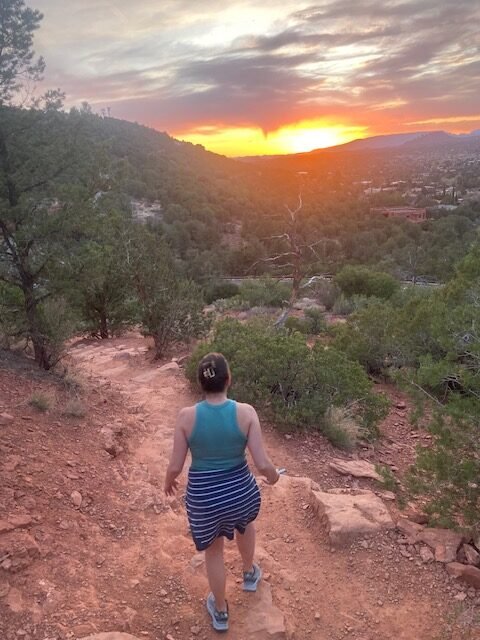
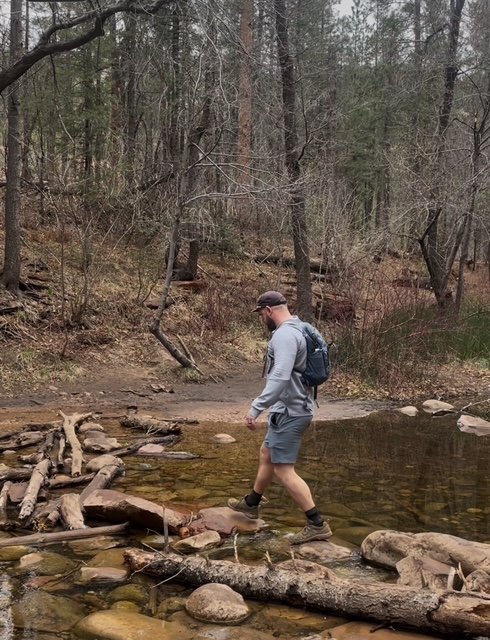
This was our 1st hike. We tossed on our new hiking shoes and walked the half mile trail to get to the vortex. The trail is very easy and beginner friendly. We enjoyed seeing cactus and taking in the views of Sedona. Once we got to the vortex location, we had to climb up the small flat top mesa. There we had a 360 panorama view of the city. Coming from the south, I will say it felt like I was on another planet. The area wasn’t too crowded. We were able to enjoy a very beautiful sunset with about 20 other people. We forgot our headlamps in the car, so after the sun vanished over the horizon, we hopped back on the trail to reach the car before nightfall. We grabbed dinner at a nice Mexican restaurant and headed back to our Airbnb to get some rest.
Day 2 – Devils Bridge and Boynton Canyon.
For the two full days we were going to be in Sedona, we decided to do 2 trails each day. One on the shorter side and one of the longer side. For the first day we decided on the Devils Bridge and Boynton Canyon to Subway Cave trails.
First off, we should talk about parking. Most of the parking lots at the trail heads in Sedona require you to purchase a RedRock Pass, or an America the Beautiful Interagency Pass. if you have one of those. You can purchase the RedRock Pass in town, or at certain trail heads. We read there was a location at the Mescal Trail head, but were unable to locate it. So we purchased a digital pass online, through our phone. You provide your license plate number and there is nothing to display. This worked for us with no issue.
Devils Bridge
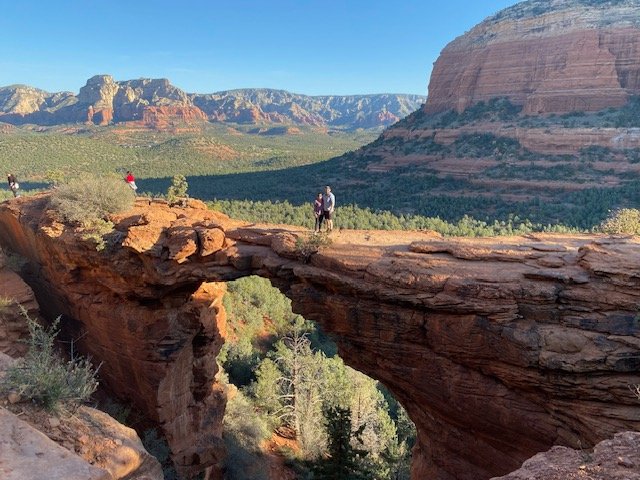
If you search anything about Sedona trails this one will likely be one of the top trails you see, and for good reason. The trail ends with a spectacular view and an opportunity for amazing social media pictures (we did it for the gram).
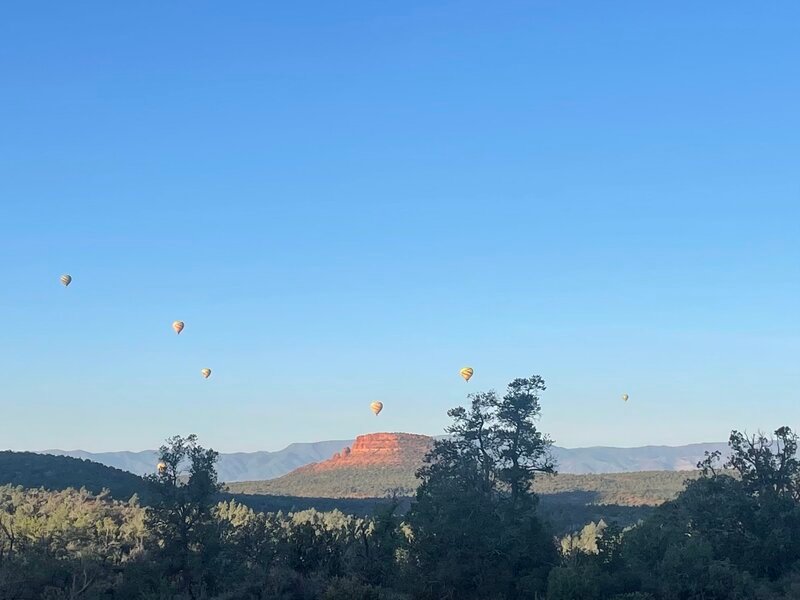
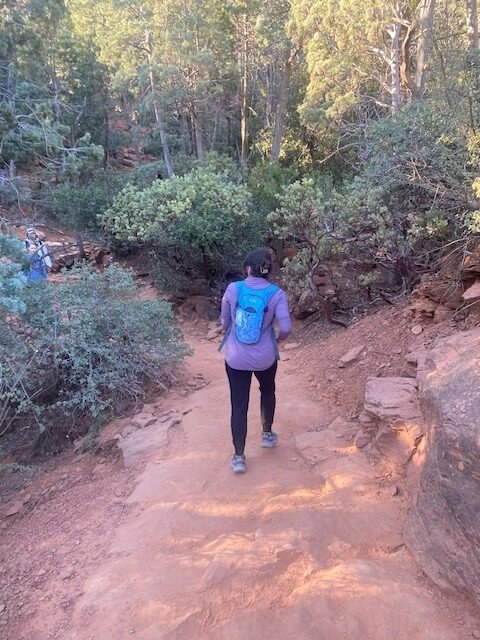
Some people choose to start this trail at the Dry Creek Road parking lot, or if you have a 4×4 you can drive to the Dry Creek Road Trail head and start from there. From our research, we decided to start at the Mascal Trail head. Trust me, it’s the more scenic way to go. We decided to get to the trail early, because we heard that they block off the parking lot at 7:00am when the shuttle busses start (shuttles are free). This was on a Thursday, and we never saw the lots close when we came back. Just be advised. We started the trail around 6:45am and were greeted with a group of yellow hot air balloons lifting off in the distance to our right. This trail was about 4 miles round trip and it was a lot of fun. You start out and are instantly transported into the desert. The path is well marked and wasn’t crowded that early in the morning. You will walk through what feels like a maze of bushes and trees and over red sand/rock for about a mile while enjoying Sedona’s landscape. All the rock formations are stunning to behold.
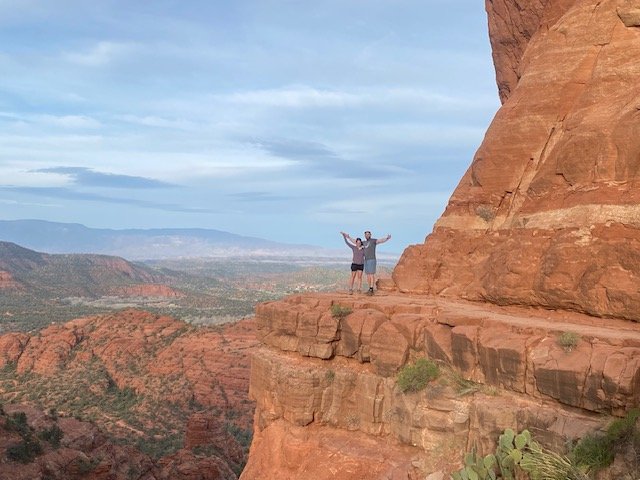
At around a mile, you will arrive at the Devils Bridge Trail head. From here it’s just 1 mile to the actual bridge. The trail starts off very similar the way the Mascal trail ends. The trial becomes wider and is actually the remains of an old access road. After this I would say the intensity steps up 1 level. As you continue, the trail narrows and you will hike up several sets of steep, rocky steps and may even need to scramble in certain areas. You will climb up a very vertical sets up stairs and arrive at a nice viewing spot. You arrive at a semi circular, flat spot that lined with all kinds of small rocks that other hikers have stacked on top of each other. It felt very artsy and added to the experience. If you get to here, then you are nearly finished. I will say that we are total beginners, but in pretty good shape. There are areas at the end, that I believe could be challenging for some people, but there was a lot of people of different fitness levels that were making it to the end, so don’t let it intimidate you. Walking up the rest of the rock, you will finally arrive at the Devils Bridge, a natural sandstone arch. Here you will find a lot of people hanging out and taking pictures. We heard the line can take up to an hour to get a picture on the bridge. Luckily, with us being there fairly early, we only had to wait for a couple of groups to take pictures. Here we had to step out of our comfort zone and ask someone to take a picture of us standing on the bridge. We packed snacks and decided to eat our peanut butter and honey sandwiches here before we made the 2 miles trip back down to our car.
Tlaquepaque
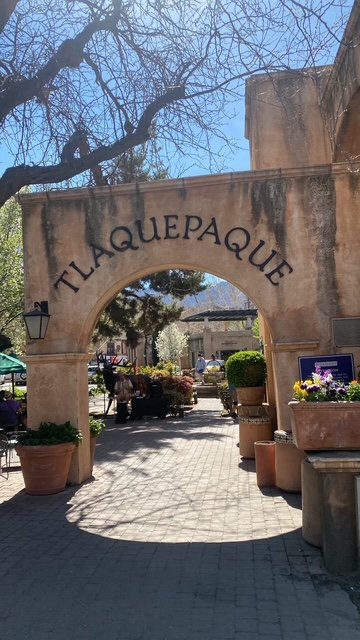
After hiking Devil’s bridge we headed over to Tlaquepaque arts and shopping village. It was created to represent an authentic Mexican village, and completed in 1978. We started our visit wandering through the beautiful and very high end art galleries and jewelry shops. We took a break at The Chai Spot, which is a cozy tea shop that has such a cute colorful patio to enjoy the wonderful tea, and to people watch. After visiting as many shops as we could, we decided it was time for lunch. We decided to stop and eat at the Pump House Station, located on the north side of Tlaquepaque. The food was delicious and hit the spot, before we got started on our next adventure.
Boynton Canyon (Subway Cave)
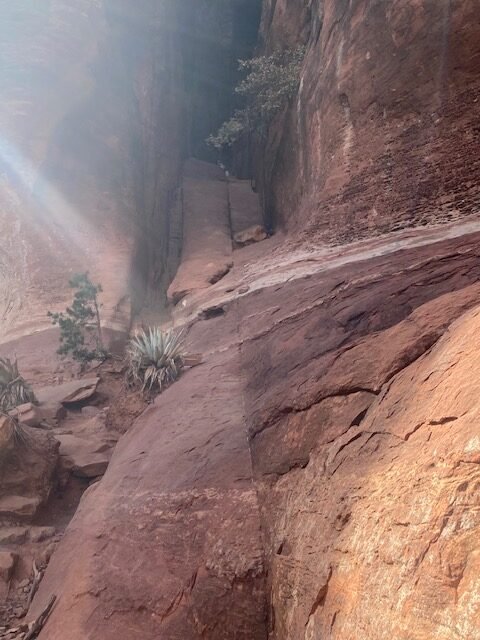
This is another top recommended hike. We decided to do this one, because of the views of the cave we saw online, as well as the Native American ruins near by. There is a small circular parking lot near the start of the trail head. Unfortunately for us, the parking lot was packed and we didn’t find a spot. We noticed on our way in that several cars were parked on the side of the road, so we did the same and walked a quarter mile to the trail head. There is a map at the start that displays several different trails you can take.

For this trail we decided to download a map from AllTrails to help us get to the Subway Cave. From what we gathered, the path to the cave isn’t clearly marked. The total trail in and out was 5.5 miles for us. The trial starts near the Enchantment Resort. The first part of the trail is fairly easy, walking along the red rock and sand. To your right, you will have a great view of the towering red sandstone formations. The hike will take you closer to the formations, and eventually the trail will turn into a tree lined path. This is where is gets tricky. Keep an eye on the ground for a man made arrow pointing to the direction of the cave. I’ve seen pictures of this being made out of stone or tree branches. AllTrails directed us where to turn off, but there was a direction arrow right at the location of the map.
This is where the trail gets more challenging. You start to gain elevation as you step up rocks and through trees. Continue upwards, and you will eventually get to the cave. There are two ways to get up. We decided to be adventurous and scramble up what I can only describe as a rock slide. Make sure you have good gripping shoes, because it can get a little sketchy on the way up. We had to work as a team to get to the top. Once you get to the top and turn around, you will realize the view was worth the entire trip.
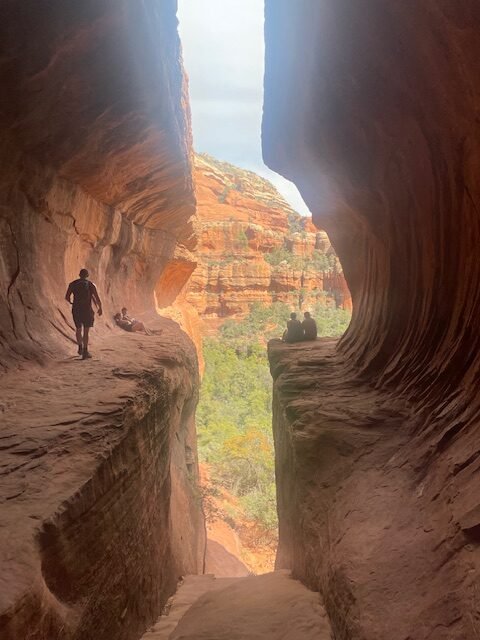
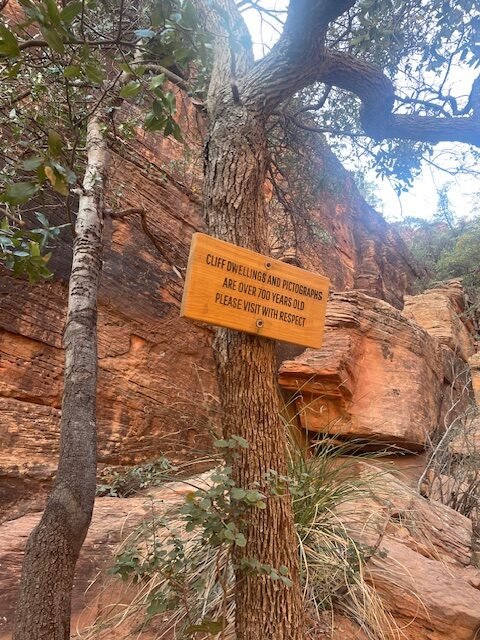
After relaxing for a bit, we walked around the corner of the cave to the ruins. This was the most terrifying part for us. There isn’t any railing so we were hugging the rock as we walked along the edge. This way will lead you to the Sinagua Ruins and the petroglyph. After exploring we took the easy way down. This is also the path you will take if you do not want to scramble up the rock slide.
Day 3 – Cathedral Rock Trail and West Fork at Oak Creek
This would be our last day of hiking. We again, picked a short trail for the morning, and a longer trail for after lunch. Cathedral Rock made our list, because it seemed the most physical of all the others we looked at. We decided to close our of hike with West Fork at Oak Creek because it looked like a green forest in the middle of the desert.
Cathedral Rock
We arrived to Cathedral Rock before 6:45 and was able to find parking. If you plan to arrive after 7:00 am, you will have to take a shuttle. The entrance to the road is blocked off after that time. This trail is only 1.2 miles round trip. Don’t let the distance fool you, this trail is a challenge. You will gain a lot of elevation in a short amount of time (741 feet). While directions are clearly marked, this is more of a choose your own adventure.
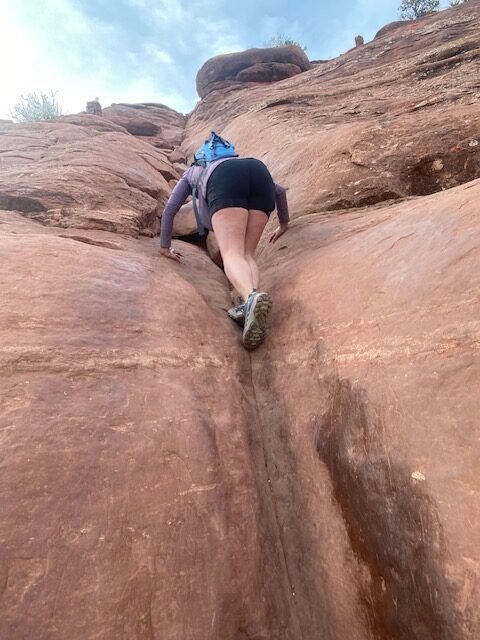
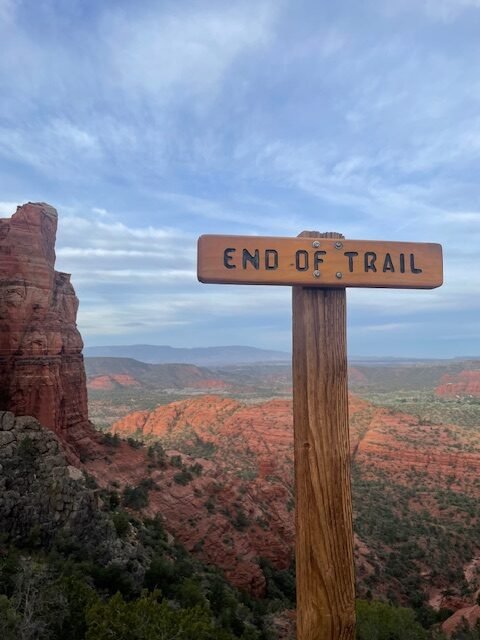
Around a quarter of the way up, you will have to navigate through a tight slit in the rock, that requires some finesse. The rest of the trail is on a pretty steep incline. You will know you have reached the top when you see the “End of Trail” sign. Here you will enjoy stunning panoramic views of Sedona. This one is short and sweet.
West Fork at Oak Creek
Be advise this trail charges a fee. We drove and payed $12 for parking. Even if you aren’t parking, walk-ins are $3 a person. The normal pass won’t get you in to this one. This was the longest hike we did. We clocked it as 7.2 miles. To us, this trail felt like we were in a different state. Nothing about the trail would make you think you were in Arizona. The entire trail is in the Coconino National Forest. The hike is shaded by tall trees and red rock walls, with a creek running the entire length of the trail.
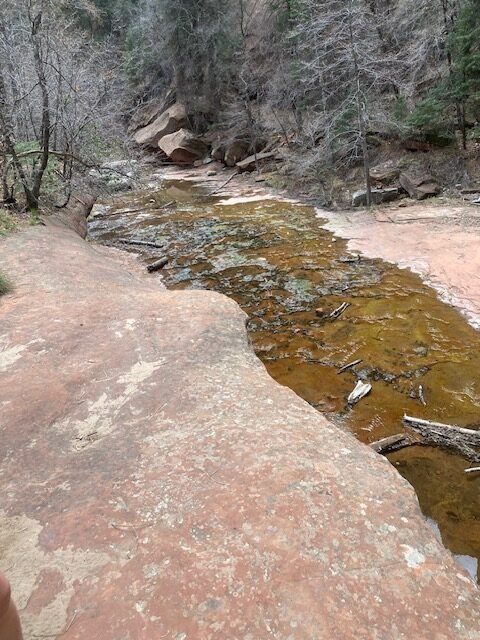
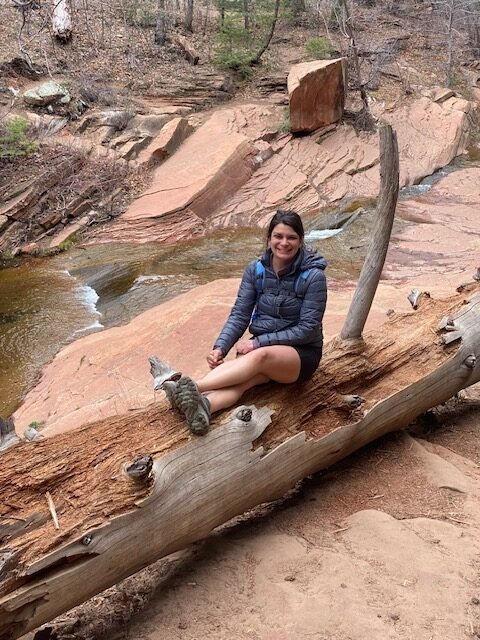
You will cross the creek approximately 13 times while hiking the trail. You are likely to get your shoes wet at some point. All the water crossing are lined with tree branches or rocks, so your balance will be tested. There were times on the hike that we wondered off the path. Luckily we had AllTrails to help get us back on the trail. The trail itself was pretty easy, but it was long.
We hiked to the very end of the maintained section of the trail. After grabbing a quick snack we made the venture back to the start. Most of the time, you will likely feel like you are by yourself. While we did see plenty of other hikers, with the trails distance you get a lot of separation and seclusion.
Day 4 – Back to Phoenix (Cubs vs Diamondbacks).
We planned our last day to end in Phoenix. We had an early flight home so we wanted to be close to the airport. Also the Cubs just happened to be playing the Diamondbacks. We live a block from Wrigley Field and had to support our team! We dropped the rental off at the airport and took a Uber back to our hotel.
Scottsdale
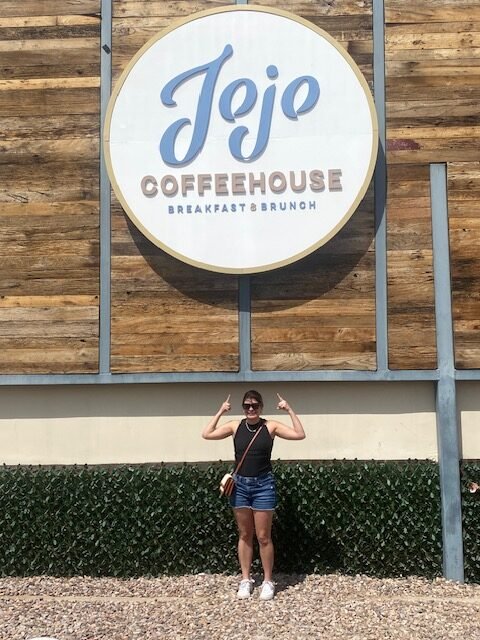
We decided to stay in Scottsdale. The Old Town area looked like a lot of fun from our research. We stayed at the Monarch Hotel which was perfectly located to all the action in Old Town. We explored a lot of the unique shops around the area. There was so many one of a kind shops and the stores went on for blocks. Our favorite activity is to walk and explore, making this a perfect activity for most of the day. We had a nice sweet treat a Sugar Bowl and brunch at JoJo Coffeehouse Breakfast & Brunch (shout out to JoJo).
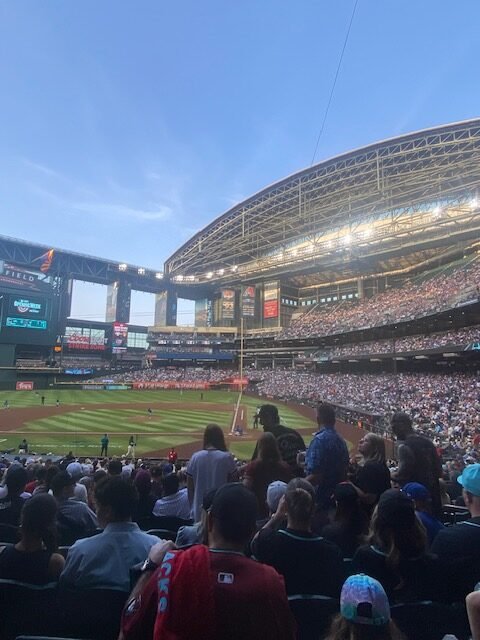
Chase Field
When we found out that the Cubs would be in Phoenix the same time as us, we knew we had to go to the game. Most of the clothes we packed were for hiking, but you know we brought Cubs gear to represent. We Ubered to the game around 6:00 pm and were dropped off a block form Chase Field. We have not been to many MLB stadium but really enjoyed the design of Chase Field. Its exterior is massive compared to Wrigley. The stadium has a retractable roof that was open the day we went. The weather was perfect for a game. The game was filled with excitement from start to finish. The game ended with Dansby Swanson faking a throw to first and chasing down Garrett Hampson at third base. Look it up – it’s the most exciting finish we have ever seen live.